JerseyFest 2012 Airbrush and Painting Seminar and Class

Welcome all to my new blog!  I will be posting all my updates and events on this blog going forward. 

Just wanted to post my review about JerseyFest 2012.  I want to say that if you did not attend or were planning on attending but then couldn’t make it…. you seriously MISSED OUT!!!!  Holy Freaking Crap!!  I had such a blast at this show… I will be attending every show held each year… which includes both the seminars that are going to be held as well as the vendor show!! 

We start on Friday’s Painting seminar and class.  Steve Parke and Rick Cantu each gave their seminar on airbushing and painting.  For me, since I never airbrushed before, I didn’t really grasp everything that was taught… and that’s the whole reason why I would go back to the 2013 event to pick up stuff that I didn’t understand at this event.  But some of the tricks and techniques in general that could be applied to general painting was super cool! 

The class taught by Saul Alvarez and Jim Capone was my favorite part of the event!!  It was a 5 – 6 hour long class.  But really…. I wish it was longer!!!  6 hours just flew by… everybody was in their zone painting … and lo and behold… it was already 8:00!!  A person who has never held an airbrush (including myself) would have had the time of their life in this class! 

I was at first intimidated when I registered for this class.  I thought people would at least know something about airbrushing.  I knew absolutely nothing!  Nada!  I bought an airbrush and compressor a while back in the hopes of airbrushing but never had the chance.  I never even had the chance to figure out how to connect the airbrush to the damn compressor!! 

But guys… the help that you receive not just from the instructors but from the people there was just unbelievable!  We were seated in groups of 5 – 6 people.  Everybody… and I mean everybody was willing to lend a hand!!  I met people on Statue Forums as well as other forums and I seriously hope that we can all stay in touch and  hang out when everybody has the time.  They were just the greatest group of people that I met! 

Now… for the class itself.  Saul and Jim are seriously the masters of painting!!  But the way they taught the course was second to none!!  Man… no words come to my mouth on the class except that I walked away like I was the freaking best airbrusher ever!!  I learned so much and just enjoyed myself so much because they made it seem so easy… I ended buying paints from Jesse (GarageKits) at the vendor show in my desire and confidence that I was going to airbrush myself!  

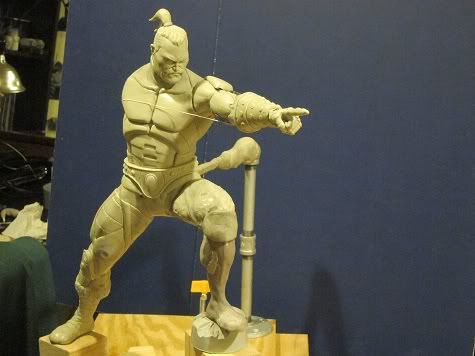
The paints used were by GarageKits colors.  I have nothing to compare this line with other airbrush paint lines..but let me tell you… no diluting or mixing of the paint…. no extreme cleaning of the airbrush… (These were my main concerns when I first started researching about airbrushing)!!    You just open the bottles and squirt a couple of drops and you were off and running!  It was just so…. easy!!!  The paints were amazing…Here are a few photos of my painted kit at the Friday Painting Class:

ImageImage

Am I a badass or what?!?!?  Hahahahahhaha… people this class was amazing… you get this lifesize kit of the ‘The Curse of the Werewolf’, you have the greatest instructors, you meet the greatest people and your working with airbrush paints that are by far the best paints and evident by how much people want these!! 

So… can you tell that I enjoyed myself?  : )

Hugh Jackman – Wolverine

Okay… so here is an extra post that I decided to throw in. This was done quite a bit back. It was a commissioned piece of just the portrait. It was my actual first portrait but it was extremely fun and I probably learned the most from this sculpt.
This took me about a month to do. Spent an average of 3 hours per day on this thing. I felt I did a good job on the portrait. This was my first sculpt where I took dozens and dozens of pictures to use as reference. I even took screen stills of DVD’s which I felt were the most helpful… just cuz I was able to capture certain poses and expressions that I felt would be necessary for this sculpt. It was really a fun process… and a process that I try to do now in all my sculpts now.
I was given a resin copy of a head from an existing statue which I molded and casted in wax. I then went to work from there.
Here are some Work in progress shots. Sorry if the pic gets cut off… I don’t know how to expand the pic.
Just added some clay after a working a bit further on to see what he would look like with hair:
Much further along:
Once I felt that I got a good final portrait of Hugh… I made a mold and casted him in resin and started work on the hair.
I did this based on Andy Bergholtz tutorial. I had never really sculpted hair in wax… and this was the first time so I just tried to follow what he did. The hair was tough as well and took a bit of time to do. After becoming more familiar with wax… and hair (a great tutorial was posted by Andy and his process in sculpting hair – Go check it out!!) I am going to rework that hair!
Here are the final pics:
Hope everyone enjoyed!
Thanks!

Man At Arms – Left Leg Part 5

Hey all!
Sorry for being a little MIA… it has been a rough start to the new year but slowly figuring things out. I also had a couple of things going on as well so I haven’t been able to provide updates.
But I did manage to post some updates on this leg. It’s not completely done yet… but majority of it is finished. The parts that are not done are the ones where there is another part that it’s connected to. I have to ensure that everything fits properly so I don’t want to finalize anything yet.
The time consuming aspect of this body part was believe it or not… was the boot. The fur as well as the straps that surround the boot took a long long time. The belt was extremely fun to do. I probably should have used Styrene strips to wrap around the belt… but instead I used wax…which took a quite a bit longer.
But this is it. It’s the combination of the parts that I have almost completely finished. I’m moving on to the other missing arm and hand next. I just want to start on the chest armor already! : )
Enjoy~

Man At Arms – Left Leg part 4

It’s late… and everybody is sound asleep. : ) It’s almost Christmas time folks! Sorry.. had to throw that in there.
It’s update time!! Been working pretty hard on this leg … sorry its been a bit slow… have a couple of things going on and this leg is pretty darn big. I did some cleaning up around the belt area….so I can start putting in the furry underwear area. This piece will most likely be removable.
Another area that was worked on was the knee. In my prior post, you’ll notice that the knee pad is flat. I thought it looked a little off… and when I went back to look at the figure, I noticed that the knee pad kind of wrapped around the knee. So I made that adjstment. You’ll also see some more detailing below the knee pad as well.
Majority of my time was spent on the boot. From what I gather, the boot is a puffy furry boot that is wrapped around in straps or bandages. So the straps will look tighter making the puffy boot stick out between the straps. Overall, it was pretty fun. It’s still rough but I will clean it up more as I go.
Here are some Work in progress pics:
That’s it! See you folks next Sunday~ Or not. If not, Merry Christmas!! Enjoy this beautiful holiday!
Thanks all~

Past Works – Batman Version 2 of 3

Hey all~
Sorry for my lack of updates on my past work. Things have been picking up so I’ve been scrounging for some time.
Let’s begin~ So last we left off, my 1st version of the Batman was taken apart and a new one began. I had a specific reference art that I was using at the time. I enlarged the reference pic as well as using some reference pic of Batman by Jim lee and went from there. I measured out my armature using the pics. I also re-did the head as well. After seeing K-Dawgs awesome work of his faces…especially the one for the Wreckers and to see how awesome those turned out, I wanted to try my hand at using a bit more details in the face.
Here are some Work in Progress pics:
Not much to say on this sculpt. Learned a little bit more about anatomy and so forth… but most importantly… actually the lesson I learned from this sculpt was looking at the sculpt from afar! I never really stepped back to see how everything looked. So… when I did step back, this is what I noticed:
His shoulders were so far apart from each other! His shoulders looked way too broad… and that point.. I was super pissed! I thought I was moving along quite well… and it seemed as though the way I wanted him portrayed was going well.
Here is a little glimpse of the fixing that was involved:
After looking at my anatomy books, I noticed that the shoulders came in a bit closer. So I made the adjustments and the final version came out to looking like this:
Not really much too say other than what I’ve said in my previous posts about my past works. Just thought I was doing well in sculpting… but as I learned more… my past works didn’t seem too appealing as I found there were plenty of errors.
Anyhow, after this was baked, I casted him in wax, and that will be the 3rd and final version of Bats. Hope you all enjoyed!
Stay tuned tonight for my Man At Arms. Thanks all~

Man at Arms – Left Leg Part 3

Hey all,
Sorry for the lack of updates of my past works. Been a bit busy this week with a couple of things going on… MAA being one of them.
Here’s a small update. Alot of the work went into smoothing out the surface. But as you will notice, the knee armor, belt behind the legs and the rivets have been almost completed as well as a few other sublte details. I’m still trying to work out how the knee armor will interact with the armor below the knee to the boots.
Here are some pics:
That’s it for this week. I will try and post 1 or 2 more past works by Wednesday… so stay tuned!
And as always, more updates on MAA’s left leg next Sunday night!
Please feel free to leave any comments or crits! Thanks all~

Man At Arms – Left Leg Part 2

Hey everyone,
Just a quick update on the left leg. Been filling areas in wax above the boots and trying to figure out how I was going to lay out the armor. Finally… the armor started making sense and have slowly gone into some detailing. Here are some shots:
Wasn’t sure if I should have connected the two muscles above the knees. On the figure, the armor is just a straight line across and it looked a little funny to me. I then decided to connect it but contour it around the muscles and thought it came it out good!
I’m still trying to sort out the knee pad armor… whether I want to have it as part of the leg or to create it as its own separate part.
Here are some detailing….
That’s about it for this week. I’m moving on too more detailing of the armor and hopefully will start on the boot area and the torso fur….that might be a bit much.. but we’ll see.
The test fit with the upper torso will be in the final update when the leg is completely done. So far… I’m pretty happy with the way it’s turning out~
Thanks all for looking~ I’ll post some more of my past works this week as well.. so check back… if not check back next Sunday for another update on my Master At Arms!

Man At Arms – Head WIP

Here is a Work in Progress of my Man At Arms. The head sculpt was started around the time that I got started in sculpting…back around early 2010. Was trying to aim for the Man At Arms that was designed by the 4 Horsemen and that came out on the 200X He Man and Motu cartoon.
Really paid no attention to symmetry. Just really wanted to make the head sculpt. I was pretty happy at the time. : )
Here are some more shots with the hairstyle.
I finished up the sculpts and baked it. I felt I did a pretty good job and hoped to sculpt the body a little later. Almost a year and a half later, started to take a stab at wax. During my time with wax, I’ve begun to the learn the importance of symmetry. And once I took a look at Man At Arms in the mirror, he looked like a reflection of Man At Arms in one of the distortion mirrors. So now, I literally have mirrors around my desk to ensure symmetry. Here’s a wax casting of the clay sculpt.
Started on fixing areas such as the eyes, cheeks, the jaws… almost everything was symmetrically off. So after scraping and dripping away a bit more and some cleaning, here are some more pics.
Eyes didn’t seem right to me… looked off. I’ve seen sculptors that leave eyes this way… and after it’s painted, it looks great! But I still didn’t like it. I left it as is to see if it would hit me… so in the meantime, I focused on how I was going to design the hair. At first, I thought of splitting the hair, since he had it in a pony tail, that that’s what the stripe across his hair was….a part line. But I didn’t like the look of it… and from what I’ve seen in the comics and cartoon… it looked like a strip of grey hair like Reed Richards. So I decided to go with that.
Here is the last WIP of the head. The final with the final look of the hair is on the Upper Torso Post.
Thanks for looking!

Past Works – Batman Version 1 of 3

Hello all,
Here is the next post of my set of past works. It’s Batman. : ) Very strange how new sculptors attempt to make this guy as their 1st or 2nd sculpt. He is really cool to sculpt. Going to try and keep this post simple and short as this was my 2nd sculpt.
I started sculpting the Bruce Wayne head while I was working on Hulk version 1. Just to take a break from the ginormous sculpt and to try my hand at sculpting a human face. For my second head sculpt, I felt pretty proud of it. There was no reference used… just came up with this look from all the Batman comics I used to read during the 80’s. Tried to go after the classic 80’s look haircut. Here’s a few pics:
My goal was to do a switch out head for my Batman sculpt….one of Bruce Wayne and one of Batman. After I finished up with the head, I attempted to do the body. At this point, realizing how bad my hulk armature turned out, I did alittle more research and found the John Brown dvd. Seeing him actually create an armature was more helpful than reading articles and seeing pics of someone making one… just cuz it didn’t make sense to me. Here’s my first actual planned armature:
I forgot the picture that I did the measurements of to get to this armature. But it was meant to be 1/4 scale to compliment my Sideshow Marvel statues. Thought it would be cool to have a DC v Marvel…. DC sculpted by me and Marvel sculpted by Sideshow. Here are few pics of the next stage, the bulking process:
I know … my room is a mess. I was a action figure collector…. now a statue collector. I sold off a lot of my collection to fund my statue collection and most of all to support my sculpting addiction! Okay… so… back to Bats! You can already see the proportions being a bit off… big upper torso and small legs. The measurements were taken from a cartoon picture that I had. Going from 2D to 3D was going to be difficult. Here is the final stage of the body:
Yeah… it was off. I figured I’d come back to fixing the proportions after I attempted my first Batman head sculpt. Nothing was baked yet at this point. I was going for the Batman head with a cartoon look. No real details but just how you saw him in comics… no lines, no features. Here is the baked head sculpt:
The biggest problem I had in doing this was keeping it in scale with my Bruce Wayne head. As I was creating the Batman head, I tried to sculpt it and maintain the size of the Bruce Wayne head. This was pretty difficult to do as the head seemed to get bigger every time I sculpted a facial feature. But it came out close.
Once baked, I attached the head to the body.
After seeing it attached…. he looked like a stocky guy and not at all like the tall boxer build Super hero I grew up with. So… here comes another lesson. Elongating armature to correct anatomy proportion. Super duper annoying! Shortening the wire is much much simpler. Always maintain some extra wire in the armature so you can shorten or elongate your proportions. I wanted to elongate the armature wire in the legs to make him look taller. So I removed the clay on the legs, cut the wire at the knees, added more wire for more length, bonded it with Apoxie and went from there. Here is the elongated version:
Elongated the legs and felt that it looked good with the Batman head. Unfortunately, not the case with the Bruce Wayne head. He ended up looking pinheaded with the Bruce head. Super Aggravation! Every time I fixed one problem, I would run into more problems. *sigh*… luckily nothing was baked yet. Not being happy with this sculpt at all… removed the clay and started over from scratch.
The creation of Batman Version 2 of 3 will be posted soon… I hope. : )
Stay tuned for this Sunday night… will have updates on my Man At Arms leg!
Thanks!

Man At Arms – Left Leg Part 1

The left leg has been started this week. Still working on his belt and the armor of the leg. Once I have that completed… I should be able to start on the more organic area (The fur below the armor). I’m still trying to figure out how I am going to lay out the armor and how the belt is going to be placed. Nothing too exciting of an update… but an update nonetheless. : )
Here is the initial start of the leg. That grey area around the hip is aves apoxie. Kind of did a rough as to where the belt would be but raised it above where the hip so that the upper torso can sit in to that raised area. (Sorry if that didn’t make sense).
And the the rest of the pics are just the gradual building of wax, smoothing and building and refining.
Stay tuned for more updates next Sunday on Man At Arms. I will also be posting more past works before then as well.
Thanks all for looking~